The topology of the problem is depicted in the following image:

We have these elements:
- Target PC (windows). This is the machine I want to connect to.
- Source PC (windows). This is the machine from where I want to connect to the Target PC.
- Gateway (windows/Unix). This is the intermediary between Source and Target.
You have to keep in mind these constraints:
- Source cannot reach Target
- Source can reach Gateway
- Target can reach Gateway
- Gateway cannot reach Target
So, the idea is to use Gateway as a bridge between Source and Target. To make this happen we will use SSH Tunnels.
Previous preparation
In my concrete scenery, Gateway is a Windows Server PC, so I will have to configure SSH Server in it, but if you have a Unix Machine this step is already taken for granted.
You can use FreeSSHD as SSH Server. It is free (obvious) and very easy to configure. For example you can check this page.
The basic steps to configure it are:
- Install with default options
- Run as a service
- Configure SSH port, only if 22 were already in use
- Configure authentication to require password
- Add some user
Besides, I'll add another step. Enable Tunneling options

Once you are done, you can check that all works properly by connecting with Putty to this machine. You should see one active user connected:


Tunneling
There will be two SSH tunnels:
- From Target to Gateway
- From Source to Gateway
The topology of the solution is depicted in the following image:
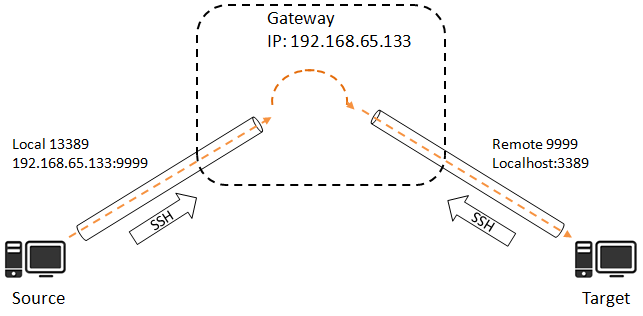
Target will open a tunnel in which all connections in Gateway to port 9999 will be redirected to itself in port 3389. Port 3389 is the default Windows Remote Desktop port.
Source will open a tunnel in which all connections in Source to port 13389 will be redirected to Gateway in port 9999.
Now you should have noted that the bridge is Gateway´s port 9999.
Tunnel from Target to Gateway
Working on Target PC, with putty you have to set the following configuration.
In Session category:
- Host name and port of the SSH Server of Gateway
In Connection category:
- Set the parametter "Seconds beween keepalives" to 180
In Connection > SSH > Tunnels category:
- Check "Local ports accept connections from other hosts" option
- Check "Remote ports do the seame (SSH-2 only)" option
- Set source port 9999, destination localhost:3389 and check the option Remote. Then push "Add"

Tunnel from Source to Gateway
Working on Source PC, with putty you have to set the following configuration.
In Session category:
- Host name and port of the SSH Server of Gateway
In Connection category:
- Set the parametter "Seconds beween keepalives" to 180
In Connection > SSH > Tunnels category:
- Check "Local ports accept connections from other hosts" option
- Check "Remote ports do the seame (SSH-2 only)" option
- Set source port 13389, destination 192.168.65.133:9999 and check the option Local. Then push "Add"

Testing the tunnel
From Source, you only need to try to connect with remote desktop to localhost:13389. The connection will travel throught the first tunnel to Gateway, and from Gateway to Target throught the other tunnel.

Thanks to Mr V (alias coffee man) for helping me with this.
Bonus
In Target, you can configure a script to use Putty Command Line options to connect automatically.In my example I named my session as "Tunel a Gateway", but for command line is better to set a one-word name, for example gatewayTunnel.
putty.exe -load gatewayTunnel -l userName -pw password
No hay comentarios:
Publicar un comentario